.
Buying a Personal Weather Station
I decided to purchase a personal weather station (PWS) and would like to share a little bit about my experience. With so many options and connection abilities, taking the first step was a bit daunting. However, once I got going, things came together quite easily, so I thought I’d make a write up for anyone who would also like to get into setting up their own PWS.
Why?
For me, I’m gone a lot, like 20+ days a month, so having one is great to keep tabs on rain fall totals, temperatures, ET, soil moisture/temp, etc. My wife would occasionally phone in a rain gauge readout, but being pregnant while wrangling three young kids (have you ever tried to herd cats on a full stomach?), my weather desires fell to her last priority. Plus, a PWS will tell me a lot more than a rain gauge will. Also, once connected to Al Gore’s internet, a PWS will give me historical data, and share all that data with all my interested neighbors. It’s fun to give back to the weather community and share in the knowledge that helps produce forecasts for everyone.
Which One?
This is like asking which car do you want. There are lots of options, but quality and durability were tops on my list. I subscribe to the notion that the poor man pays twice. I read a lot of people’s stories where they bought a cheaper model only to buy a better one, and then finally, on their third one, got a nice one. I can’t afford to do that, so I bought a Davis first. They have good connection options (to software and internet WX sites) and the Pro models offer upgradability for future add ons. I wanted to be able to add soil moisture probes and be able to calculate ET, UV, and Solar radiation, so I went with the Vantage Pro2 Plus. If you don’t want all those calculations, a Vantage Vue is a great option, too.
Viewing Data
PWS’s will come with a console that shows all the data that it receives from the station outside. As I’ve learned, except for the actual instruments outside, the rest of the weather station hardware still thinks it’s 1991. iPads have spoiled us because most consoles come with little lcd displays with a backlight. I guess wx geeks don’t care, but for the rest of us, it’s a little shocking. Out of the console, there are serial (yes, serial, remember that?) connections for connecting to a computer. Hello 1987!
Getting online
The real sweetness of owning your own PWS is getting it online. You can check on your data from anywhere, plus you can share your information with neighbors and the world. Essentially, you connect your console to the internet, and it sends along all the data it receives. We put our console at the end of the kitchen counter and it connects to the internet there. This is where all my Google reading drove me crazy. PWS->Console->Internet isn’t very straight forward or intuitive. I needed to buy a data logger, which does two things: 1) Exports the data received from the console to some other device like a computer, 2) stores data for a while if the computer is not on and recording that data. For Davis consoles, you can choose serial, USB 1(!), or ethernet via WeatherLink IP. Some windows computers use serial, but most people go with either WeatherLink or USB. I went with the USB data logger. The ethernet “IP” logger initially looks attractive, but it is hobbled by a high price, and being locked into WeatherLink.com which is run by Davis. Your data uploads to Weatherlink, and then some (not all) is sent to other places like Weather Underground. USB/Serial will send all your data directly to weather sites without the need of WeatherLink, or having to depend on WeatherLink to be working.
The USB logger then plugs into a USB hub because many devices now won’t read the data from USB 1, so the hub transfers it to something readable with USB 2. At this point, you have a lot of options again. Many people connect this USB hub to a computer that runs 24/7. Software like WeatherCat then record the data, display it in graphs, and upload it to a myriad of weather websites like Weather Underground, NWS, CWOP, and so forth. I didn’t want to run a computer 24/7, mainly for energy reasons, but it also seemed like a pain. What if the console could upload automatically to the internet, and I could use my computer to see the data only when I wanted to? That sounded like the best of both worlds, so that is the route I took. Meteobridge solved that for me. It’a small router with almost no energy usage that was the missing link between the console and the internet that didn’t involve a computer being on all the time. (There are other options, but this is the route I took). You can build your own Meteobridge or buy one already set up for you. It is half the size of an iPhone, accepts a USB input (from the data logger/hub) and will connect to your internet, either by ethernet or wifi. I use the ethernet connection for better reliability.
Give your Meteobridge a static IP on your network. This is good network practice anyway, but will help you find it later when logging into it. With a static IP, I just enter its IP which takes me to the login screen. Setup is dead easy, and there you can tell it about your PWS, its Lat/Long, and where you want to upload your data to. To upload to a website, setup an online account with each one, then enter those credentials into the Meteobridge GUI. After running the Meteobridge for nearly a year with no problems, I decided to branch out and buy WeatherCat, even though this would mean my computer needed to run 24/7. I like the simple website that the Meteobridge will make via the Saratoga-Weather templates, but in the end, I wanted to make a fancier website (this one), so I use WeatherCat for this site. I still use the Meteobridge, and it hasn't let me down.
Websites
If you only upload to one website, I suggest Weather Underground (even if you are conservative, ha!). It will accept data every five seconds to give you and anyone else “rapid fire” information on a site like this, and you can share that site with family, neighbors, and friends. Weather Underground is also a great place to send data to for historical recording, graphs, and use with apps. Setup an account with them here and you can manage things to your geek’s content.
For iPhone, there are a few really good options for apps, most of which pull data from Weather Underground (another reason to sign up for an account there). My favorite is PWS Monitor for both iPhone and iPad. For iPad only, Wunder Station is a good option. Even if you don't have a PWS, these are great apps to use to see stations near your location. If you buy WeatherCat, you can use an app to see your data live, streamed from your home computer.
Software
Remembering that a lot of this stuff hasn’t changed from the early 90’s, most software is written for the copy-cat operating system of that era. For Mac, there are very few options, but that almost makes it easier. Weather Display has a crappy version written for OS X, Weather Snoop is popular and is available from the App Store, and WeatherCat has a free trial that I eventually paid for. Here is a great list of available weather software.
With a web host, you can also use Saratoga Templates, uploaded to your host, which your Meteobridge will populate for you automatically, without the need of a 24/7 computer. I spent an hour or so fiddling with the Saratoga templates and made the "Meteo" section of my website, without the need of a running computer.
Irrigation Controllers
Some fancy irrigation controllers come with their own suite of sensors for soil moisture, rain fall rates and totals, and more. However, PWS’s are much more accurate than the cheap sensors that come with those nice controllers, and an irrigation controller with good integration to use PWS data is a good way to go. For this, I use a Rachio. It waters your grass based on evapotranspiration calculated directly from your PWS data. You can set the Rachio to be as hands on or hands off as you like, and it has done a great job on my lawn using my weather station data. It is controlled via a website or an even better iPhone app for worldwide access to your lawn’s watering needs.
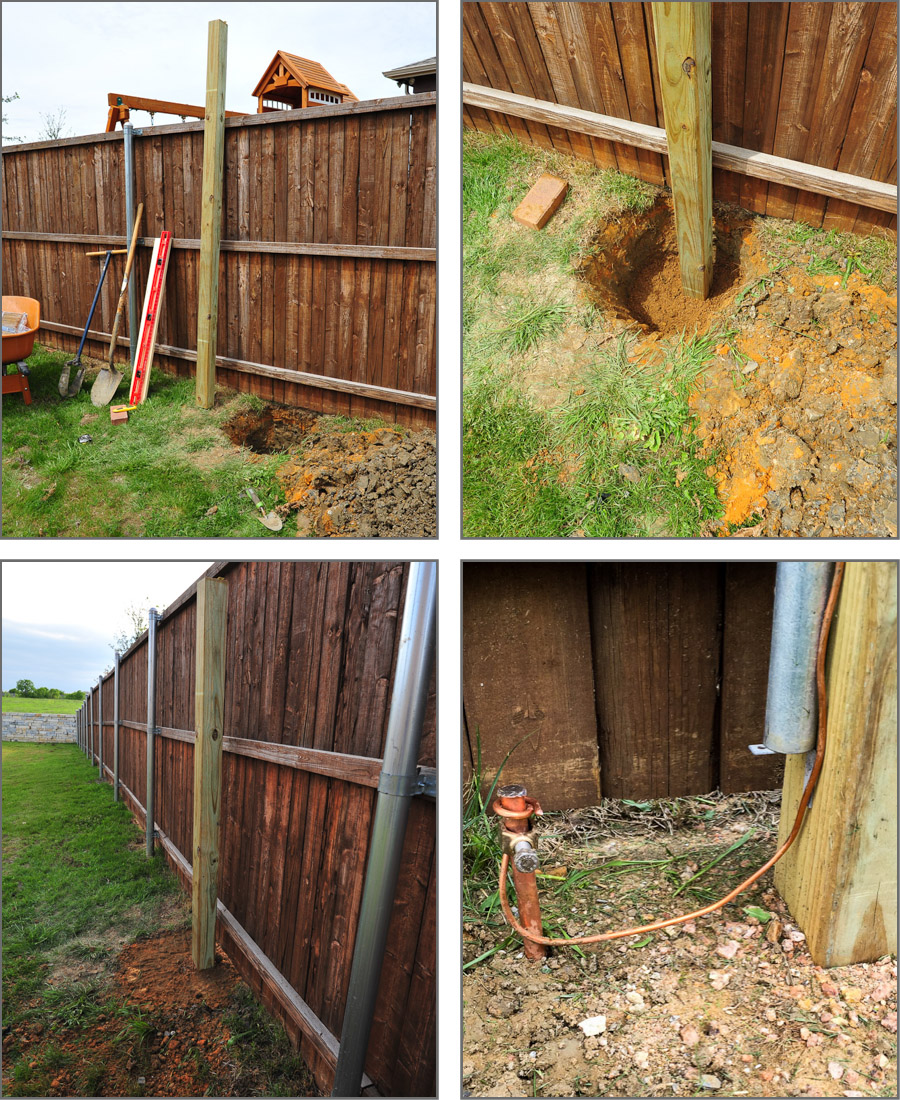
Installation
For the setup, I simply dug a hole and put a 4x4 post in the ground. I read that a good formula for hole depth for a post is the buried post should be half the length of post that remains above ground. I also surrounded the post with crushed granite instead of concrete for two reasons. 1) Concrete will hold water next to the post and rot it faster whereas gravel like material will let water shed away from the post, and 2) I didn't want a nightmare if I wanted to remove this someday.
I connected a 1.25 inch conduit pole to the post because the PWS will mount easier to a pole, and adjusting height and direction is then easier, too. The whole setup is very solid. Technically, the anemometer should be 30' in the air but mine isn't due to local restrictions (HOA). The temperature should be taken roughly 5-7' above ground or grass (not asphalt). Finally, I installed a grounding wire. I've read that this won't do much to protect against lighting strikes (my wire isn't big enough, it's six gauge copper) but at least it makes me feel better, and it will cut down on static electricity buildup on the station instruments from wind. The grounding rod is six feet deep and pounding it down wasn't fun!
TL;DR
I hope to develop an accurate watering strategy by using E/T, Soil Moisture, and rain fall amounts to take the deep and infrequent lawn watering to another level. Besides being fun to muck around with, a PWS may end up paying for itself in irrigating water savings. PWS are a great way to learn about the weather, treat your lawn right, and share your data with others, from neighbors down the street to scientists at the NWS. Finally, I bought my equipment at Scientific Sales. They have great customer service and are much cheaper than retail.
All the best, and hope this helps.
~Toby